Steps to run the Appium code on real Android devices
Step 1: Connect your testing Mobile device via USB to a PC.
Step 2: Enable Developer Mode on Mobile Phone before automating the app.
- Navigate to the Settings app on the phone
- Scroll down and click on the Developer Options
- Turn on the Developer Options and click the USB Debugging.
- Some devices do not have “Developer Options” and hence the way to enable Debugging mode is to launch the Settings screen.
- Once done, tap “About Phone" and then scroll to the bottom and tap on "Build Number" 7 times (Yes 7 times)!
.png)
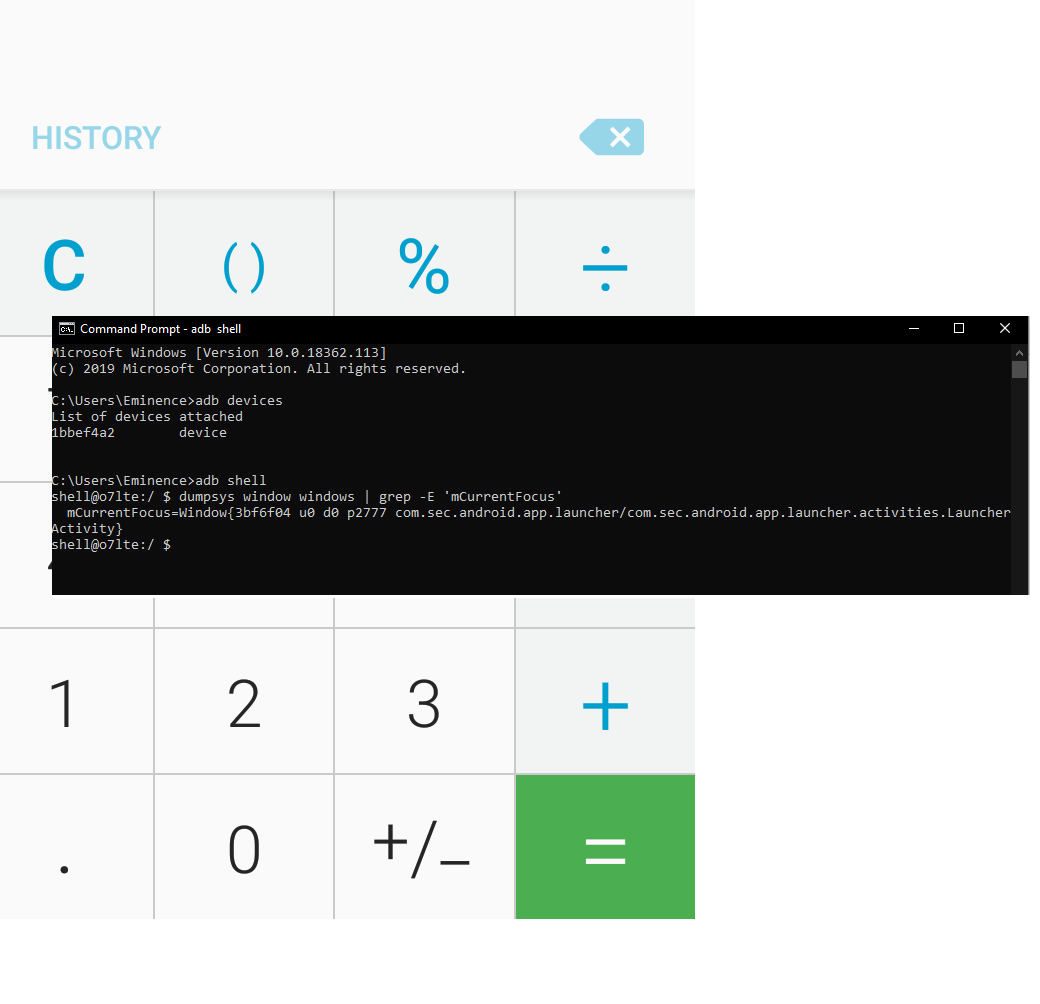
Step 3: Once done in the above steps launch the terminal and enter the command ‘adb devices’. Connected devices are listed in the terminal.
.png)
Step 4: Get the app package and app activity for the tested app.
- Open the tested app
- Navigate the command prompt
- Enter the commands ‘adb shell’ and “dumpsys window windows | grep -E 'mCurrentFocus'”
Step 5: Launch the Appium and start the server
.png)
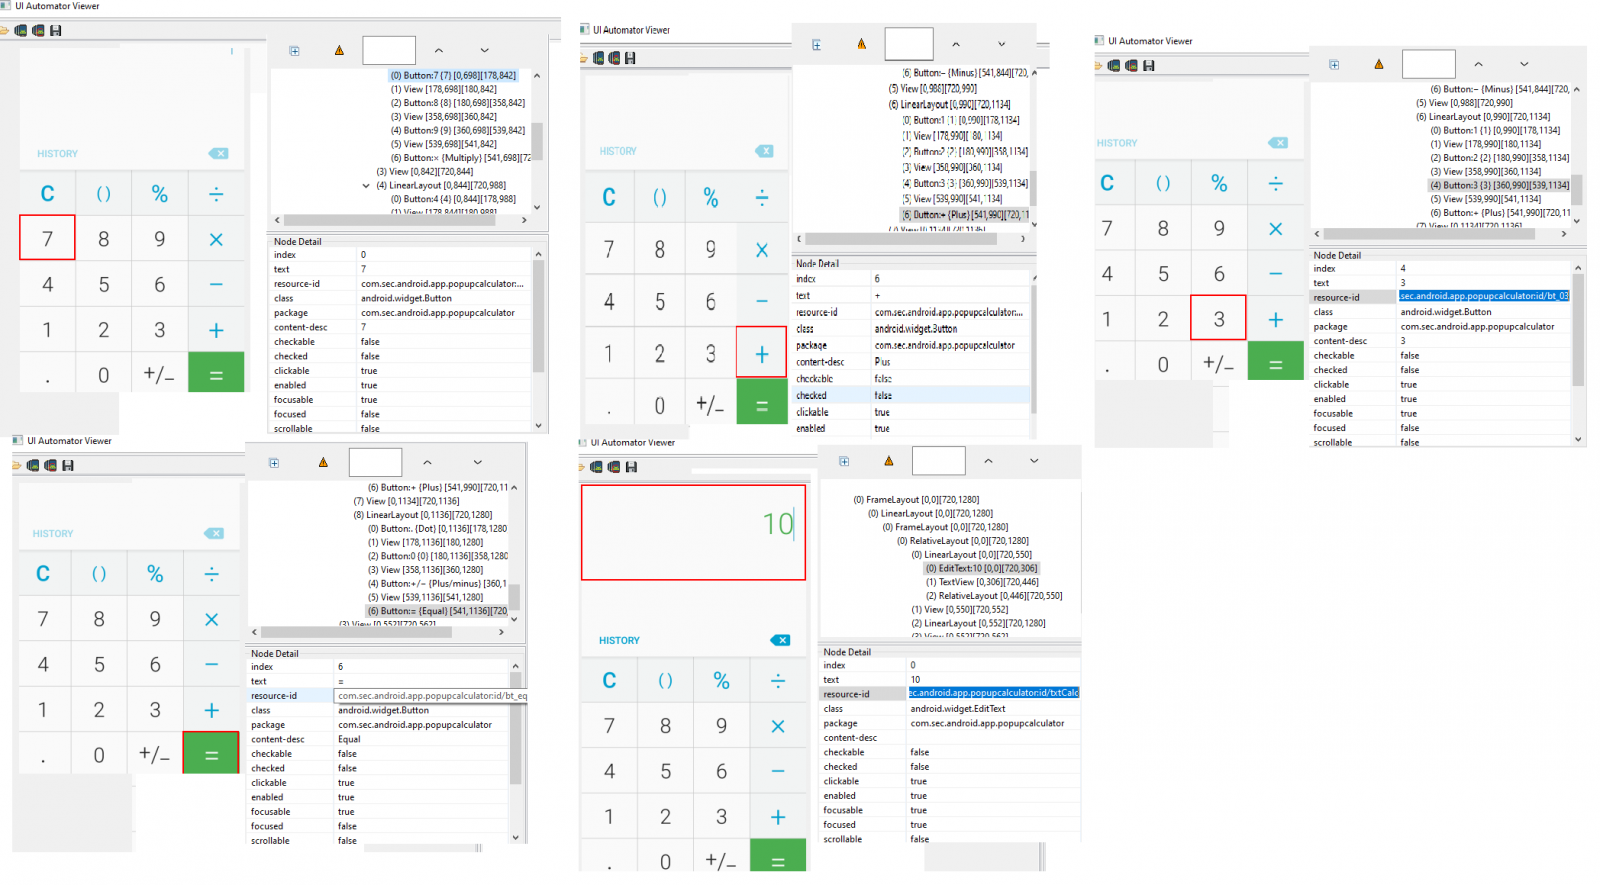
Step 6: Inspect an element:
- open the command prompt
- Type the command “uiautomatorviewer“. The Automator viewer is opened.
- Click the Mobile icon. Click an element
- Inside the Panel, we can see the XPath for the element.
- Sample Locators
Step 7: Launch the Intellij idea and create a new project and type the code
import java.net.MalformedURLException;
import java.net.URL;
import io.appium.java_client.MobileElement;
import io.appium.java_client.android.AndroidDriver;
import org.openqa.selenium.By;
import org.openqa.selenium.WebDriver;
import org.openqa.selenium.WebElement;
import org.openqa.selenium.remote.DesiredCapabilities;
public class Calculator {
public static void main(String[]args) throws MalformedURLException{
WebDriver driver;
DesiredCapabilities capabilities = new DesiredCapabilities();
capabilities.setCapability("deviceName", "My phone");
capabilities.setCapability("udid", "1bbef4a2");
capabilities.setCapability("platformName", "Android");
capabilities.setCapability("platformVersion", "6.0.1");
capabilities.setCapability("skipUnlock","true");
capabilities.setCapability("appPackage", "com.sec.android.app.popupcalculator");
capabilities.setCapability("appActivity","com.sec.android.app.popupcalculator.Calculator");
driver = new AndroidDriver(new URL("http://127.0.0.1:4723/wd/hub"),capabilities);
WebElement numSeven= driver.findElement(By.xpath("//*[@resource-id='com.sec.android.app.popupcalculator:id/bt_07']"));
numSeven.click();
WebElement addSign =driver.findElement(By.xpath("//*[@resource-id='com.sec.android.app.popupcalculator:id/bt_add']"));
addSign.click();
WebElement numTwo=driver.findElement(By.xpath("//*[@resource-id='com.sec.android.app.popupcalculator:id/bt_02']"));
numTwo.click();
WebElement remove=driver.findElement(By.xpath("//*[@resource-id='com.sec.android.app.popupcalculator:id/bt_backspace']"));
remove.click();
WebElement numThree=driver.findElement(By.xpath("//*[@resource-id='com.sec.android.app.popupcalculator:id/bt_03']"));
numThree.click();
WebElement equalSign=driver.findElement(By.xpath("//*[@resource-id='com.sec.android.app.popupcalculator:id/bt_equal']"));
equalSign.click();
WebElement results=driver.findElement(By.xpath("//*[@resource-id='com.sec.android.app.popupcalculator:id/txtCalc']"));
assert results.getText().equals("10"):"Actual value is : "+results.getText()+" did not match with expected value: 10";
driver.quit();
}
}
Step 7: Run the program
Step 8: Output:
.png)
Steps to run the Appium code on Android Emulator devices
Step 1:You should have Android SDK installed on your system in order to create a virtual device. If you already installed it then it’s good but if you don’t install it then you need to install it first.
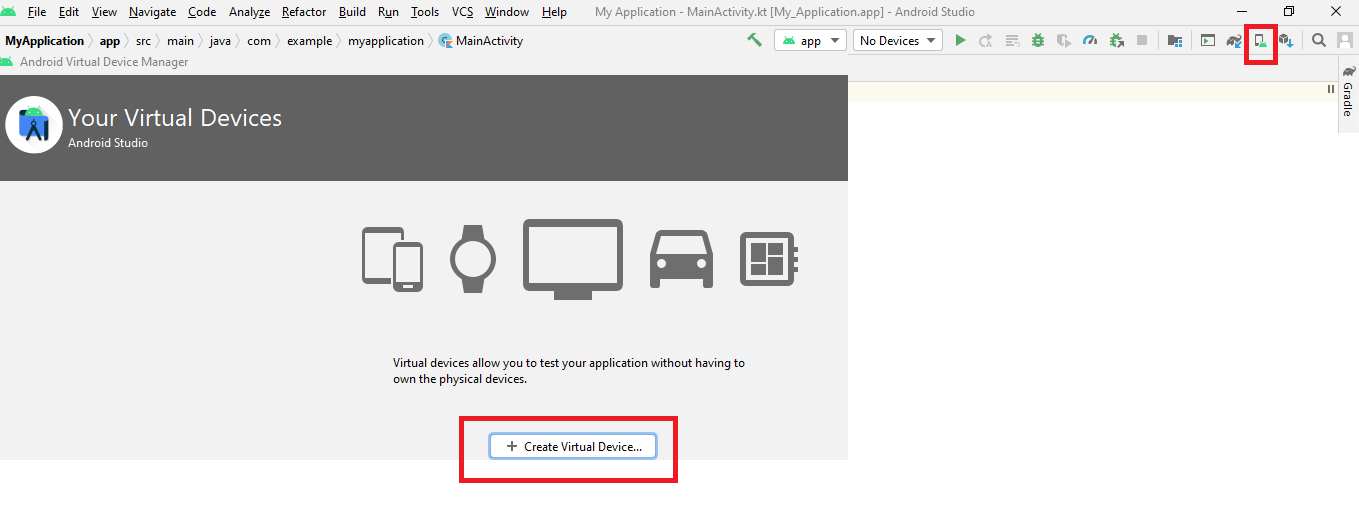
Step 2: Launch Android SDK and click on the AVD icon.
Step 3:A new window will appear with a list of already created virtual devices and if there is no such device in the list click on create virtual device button.
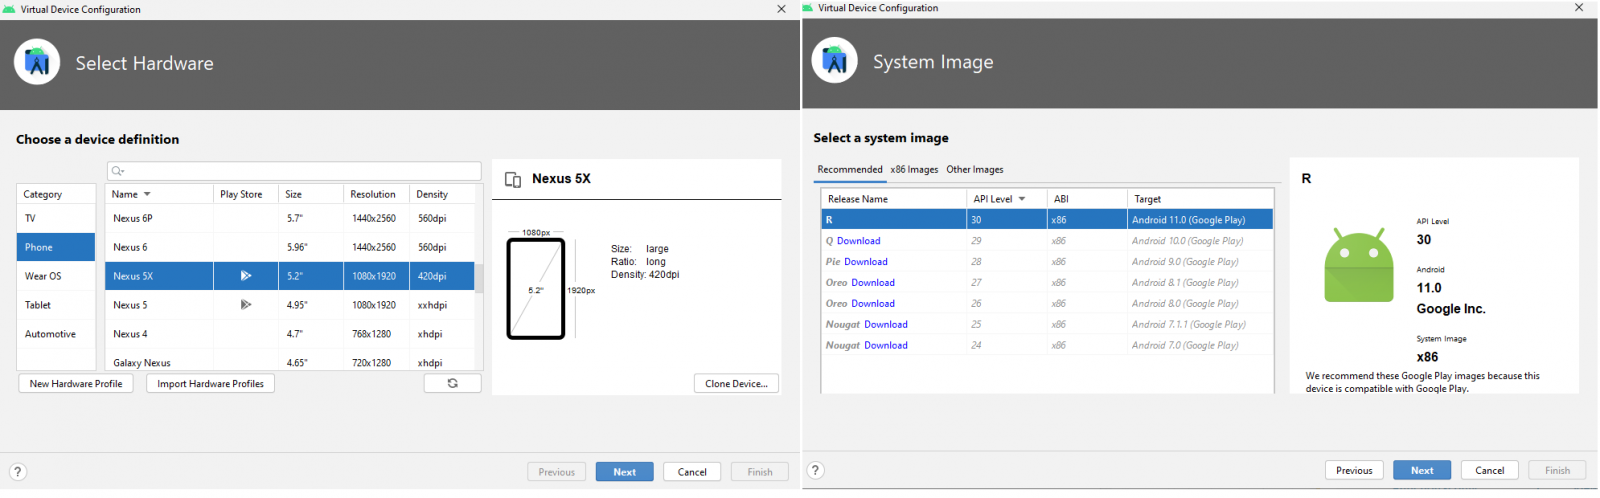
Step 4:After clicking on the create virtual device button, a window will appear where you need to select the hardware configuration of your virtual device. Select the configuration as per your need and click on next.
Step 5:Now the system will display you the recommended system image for your virtual device, here you choose a system image that best suits your need. You can choose the default image or if you want then you can download any other system image and choose it and click on the Next button.
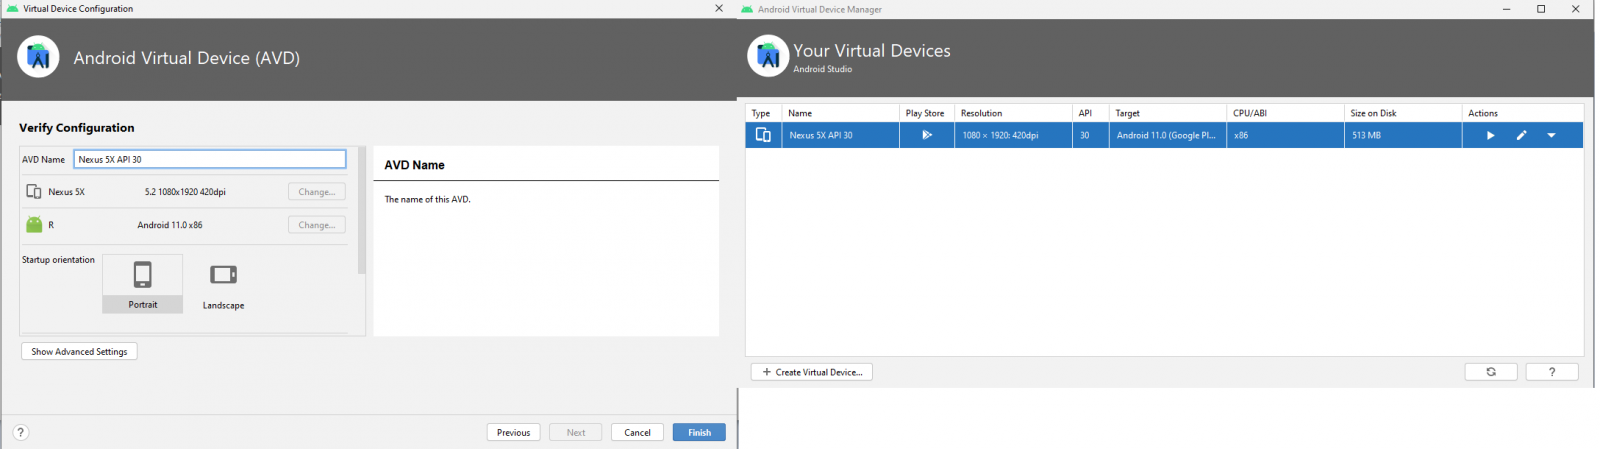
Step 6:Now, you will see a window providing you the default name for your virtual device, if you want to change the name you can do it here and it will also give you the option to change your hardware and system image along with the orientation of the device. If you want to make some changes you can do it here and then click on finish.
Step 7:After clicking on the finish a window will appear displaying a list of your created virtual devices along with the details of the resolution, API, android version, etc. In the Actions column, there is a play button click on it in order to run your virtual device.
Step 8:After clicking on this play button wait for some time as it will take some time to start your virtual device. Once, your device has been started, you will be able to run your Appium code on this device by making some necessary changes in the configuration part of your test script.
Step 9:Get the version of your virtual device Go To Settings -> About emulated device-> Android Version.
.png)
Step 10:Get the app package and app activity the same procedure as the real device.
Step 11:Get the inspect of an element same procedure as the real device
Step 12: Snippet code for Desired Capabilities Setting for Emulator
DesiredCapabilities capabilities = new DesiredCapabilities();
capabilities.setCapability("deviceName", "My phone");
capabilities.setCapability("udid", "emulator-5554");
capabilities.setCapability("platformName", "Android");
capabilities.setCapability("platformVersion", "11.0");
capabilities.setCapability("avd","Nexus_5X_API_30");
capabilities.setCapability("appPackage","com.google.android.calculator");
capabilities.setCapability("appActivity","com.android.calculator2.Calculator");
driver = new AndroidDriver(new URL("http://127.0.0.1:4723/wd/hub"),capabilities);
Steps to run the Appium code on Android devices in BrowserStack
Step 1: To Create a Browser stack account https://www.browserstack.com/users/sign_up
Step 2: Get a username and access key in your account. Username and access key value will be used later to set the app capability to specify the application under test in your Appium test scripts.
Step 3: Ensure you have Appium’s Java client library installed.
Step 4: Access to an Android app (.apk or .aab file)
Step 5:Upload your Android app (.apk or .aab file) to BrowserStack servers using our file manager.
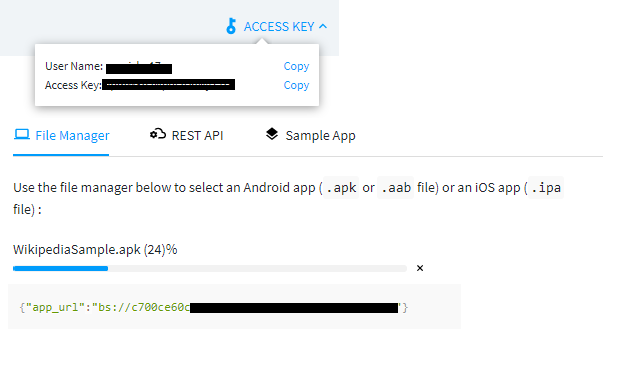
Note the value of app_url returned in the API response (bs://c700ce.....). This value will be used later to set the app capability to specify the application under test in your Appium test scripts.
Step 6:Specify the real Android you want to test using the device capability.
Step 7:To initialize an Appium driver, use a remote BrowserStack URL along with your BrowserStack access credentials
https://YOUR_USERNAME:YOUR_ACCESS_KEY@hub-cloud.browserstack.com/wd/hub
Step 8:Configure your test script
- Using desired capabilities-Desired capabilities are a series of key-value pairs that allow you to configure your Appium tests on BrowserStack.
- Set access credentials-Use username and access key capabilities to set your BrowserStack access credentials. This is required to authenticate your tests.
- Specify application under test-Use the app capability to specify your uploaded app that will be installed on the device during test execution. Set its value using the app_url obtained in Step 5
- Select a device for testing-Use the device and os_version capability to specify the device for testing.
- Create remote web driver- Initialize a remote web driver to start a new test session on BrowserStack. You are all set to remotely test your app on BrowserStack devices.
import java.net.URL;
import java.util.List;
import java.util.function.Function;
import java.net.MalformedURLException;
import io.appium.java_client.MobileBy;
import io.appium.java_client.android.AndroidDriver;
import io.appium.java_client.android.AndroidElement;
import org.openqa.selenium.support.ui.ExpectedConditions;
import org.openqa.selenium.support.ui.WebDriverWait;
import org.openqa.selenium.WebDriver;
import org.openqa.selenium.remote.DesiredCapabilities;
public class BrowserStackSample {
public static void main(String[] args) throws MalformedURLException, InterruptedException {
DesiredCapabilities caps = new DesiredCapabilities();
caps.setCapability("browserstack.user", "testi17");
caps.setCapability("browserstack.key", "VpmM8bJNkjsdw");
caps.setCapability("app", "bs://c700ce60cf13ae8edsdwqwqe231427c");
caps.setCapability("device", "Google Pixel 3");
caps.setCapability("os_version", "9.0");
caps.setCapability("project", "First Java Project");
caps.setCapability("build", "Java Android");
caps.setCapability("name", "first_test");
AndroidDriver driver = new AndroidDriver(
new URL("http://hub.browserstack.com/wd/hub"), caps);
driver.findElement(By.xpath("//*[@resource-id='com.sec.android.app.popupcalculator:id/bt_07']")).click();
driver.quit();
}
}
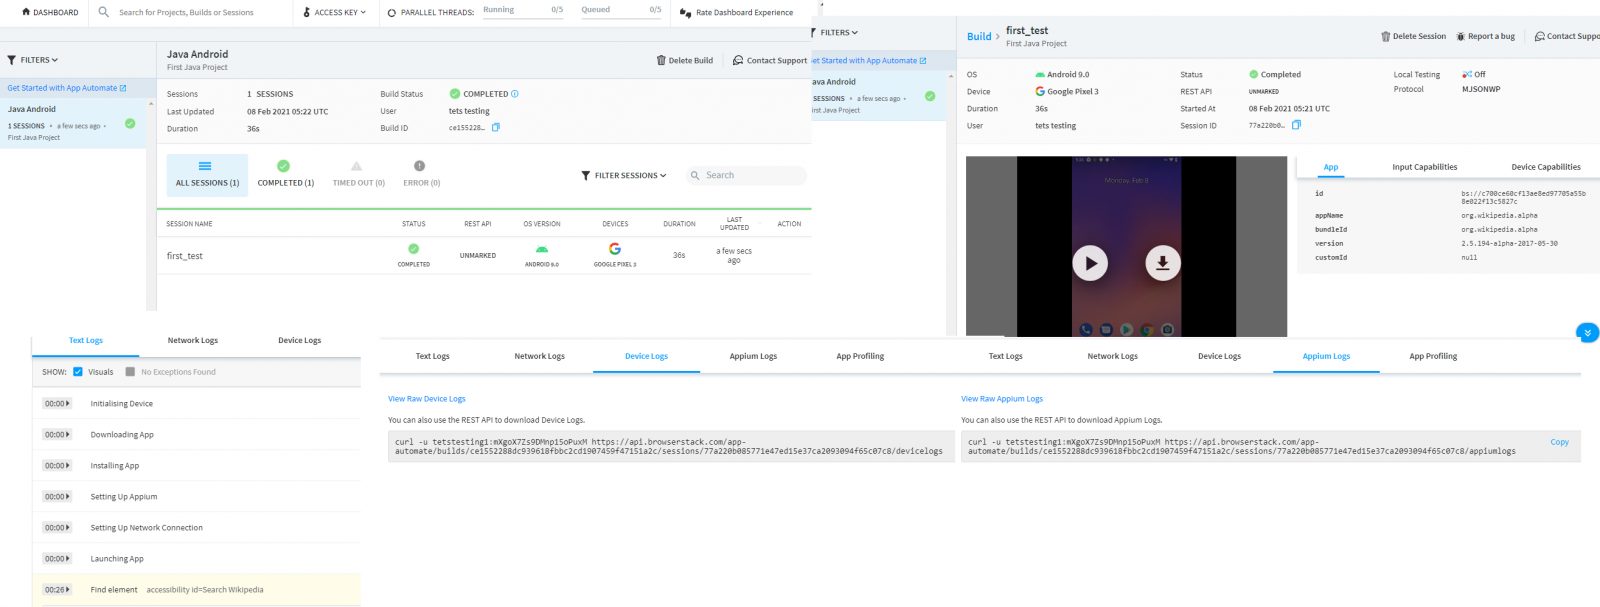
Step 9:Execute your test script
Step 10:View test results of your test sessions on the App Automate dashboard. The details of a specific test session to view its execution details and debugging information such as video recording, network logs, and device logs.