Framework Setup

In this section, we will setup a Selenium test automation framework in Page Object Model design pattern. 

Setting up the Project

     1. Create a Java project in your IDE.
     2. Use Maven or Gradle as your build tool, depending on your preference.
     3. Add Selenium WebDriver, TestNG to the Dependencies. 
     4. Add chromedriver.exe to the project root. 

Project Structure

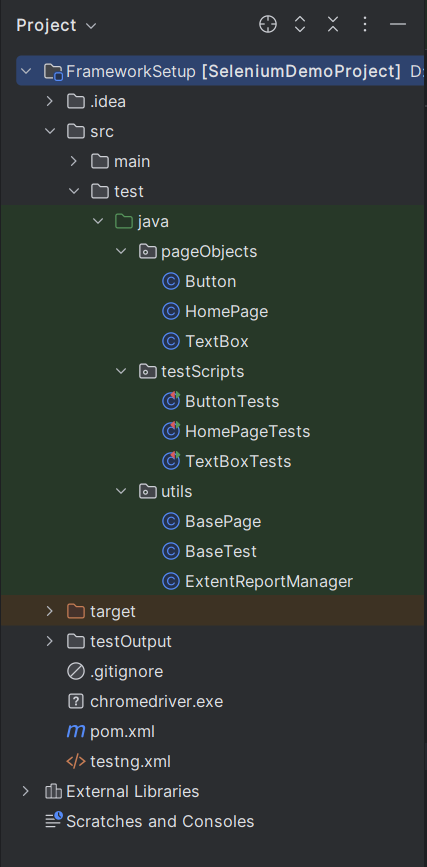
As per Page Object Model, Each web page in the application will have its own Java class inside the pageObjects package. These page classes will be used by the test classes under the testScripts package to perform test executions. In Utils package, we will handle BasePage and BaseTest class. 
Project Structure reference image: 

Project Structure reference image: 

BasePage Class

This BasePage class will be the first one we create in this project.

It is responsible for handling common web interactions such as clicking, typing, and waiting for elements to become visible. In earlier examples, actions were performed directly, but this approach is fragile. A well-structured framework centralizes these interactions to ensure stability and error handling

Here is the example code in BasePage, which helps you to understand the usage of BasePage. 

package utils;
import org.openqa.selenium.By;
import org.openqa.selenium.TimeoutException;
import org.openqa.selenium.WebDriver;
import org.openqa.selenium.support.ui.ExpectedConditions;
import org.openqa.selenium.support.ui.WebDriverWait;
import java.time.Duration;
public class BasePage {
    // Declaring WebDriver instance for interacting with the browser
    protected WebDriver driver;
    // Declaring WebDriverWait instance for implementing explicit waits
    protected WebDriverWait wait;
    // Constructor to initialize driver and wait
    public BasePage(WebDriver driver) {
        this.driver = driver;
        this.wait = new WebDriverWait(driver, Duration.ofSeconds(10));
    }
    // Waits until the element becomes visible
    protected void waitForVisibility(By locator) {
        try {
            wait.until(ExpectedConditions.visibilityOfElementLocated(locator));
        } catch (Exception e) {
            throw new TimeoutException(locator + " is not displayed in given time", e);
        }
    }
    // Clicks the given element after ensuring it's visible
    protected void click(By locator) {
        try {
            waitForVisibility(locator);
            driver.findElement(locator).click();
        } catch (Exception e) {
            throw new RuntimeException("Unable to click the element located by " + locator, e);
        }
    }
}


This approach ensures: 
      Elements are interacted with only after they are visible
      Provides clear error reporting if the interaction fails
      Improved test reliability and maintainability

BaseTest Class

The BaseTest class plays a vital role in the test automation framework. It is responsible for
     Initializing the browser before test execution
     Opening the target application URL
     Closing the browser after all tests are finished

Later in this tutorial, we will also use this class to manage Extent Reports.

All test classes in the testScripts package will extend this BaseTest class to inherit the setup and teardown functionality. 

Example code in BaseTest

package utils;
import org.openqa.selenium.WebDriver;
import org.openqa.selenium.chrome.ChromeDriver;
import org.testng.annotations.AfterClass;
import org.testng.annotations.BeforeClass;
import java.time.Duration;
public class BaseTest {
    // Declaring WebDriver instance for interacting with the browser
    protected WebDriver driver;
    @BeforeClass
    public void setup(){ // Setup method to initialize WebDriver before any tests run
        driver = new ChromeDriver(); // Initialize Chrome browser driver
        driver.manage().window().maximize(); // Maximize browser window
        driver.get("https://www.qafeast.com/"); // Navigate to the URL
    }
    @AfterClass
    public void tearDown(){ // Tear down method to close browser after all tests finish
        if(driver != null){
            driver.quit(); // Quit the driver only if it was initialized
        }
    }
}


Set up Classes in PageObject Package

After creating the base classes, the next step is to create page classes inside the pageObjects package. Each page class represents a specific web page and stores all the actions that can be performed on that page.

Example Page class code: 

package pageObjects;
import org.openqa.selenium.By;
import org.openqa.selenium.WebDriver;
import utils.BasePage;
public class HomePage extends BasePage {
    public HomePage(WebDriver driver) {
        super(driver);
    }
    // Click Accept Cookie from Cookie Consent Banner
    public void acceptCookies() {
        click((By.id("gdpr-cookie-accept")));
    }
    // Click on Tools Menu Item
    public void clickTools() {
        click((By.cssSelector("li[class='tut_ fr_tls']")));
    }
    //Click Demo Site link Text
    public void gotoDemoSitePage() {
        click((By.linkText("Demo Site")));
    }
    //Verifying Demo site is opened
    public void verifyDemoSiteOpened(){
        waitForVisibility((By.xpath("//h2[text()='Textbox']")));
    }
}


The HomePage class below extends the reusable BasePage class, which contains common methods like click() and waitForVisibility(). This keeps the page class clean and focused on page-specific actions. 

Each method inside the page class encapsulates a single action or verification related to the Home page. This makes the test scripts easier to read, write, and maintain. You can follow the same approach to create page classes for all other web pages in the application.

Set up Classes in TestScript Package

Once the page classes are created in the pageObjects package, the next step is to write your test cases inside the testScripts package. These classes contain the actual test scenarios that use the page object classes to interact with the web application and verify its behavior.

Each test class typically corresponds to a specific feature or module. This helps in keeping your test structure organized, scalable, and easy to manage.

Example HomePageTests class

package testScripts;
import org.testng.annotations.Test;
import pageObjects.HomePage;
import utils.BaseTest;
public class HomePageTests extends BaseTest {
    @Test //Represents a test case
    public void gotoDemoPage(){
        HomePage homePage = new HomePage(driver);
        homePage.acceptCookies();
        homePage.clickTools();
        homePage.gotoDemoSitePage();
        homePage.verifyDemoSiteOpened();
    }
}


This test case demonstrates how to use the HomePage object to perform actions and verifications in a clean, readable format. The test class extends BaseTest, which handles browser setup and teardown, allowing test methods to focus purely on the scenario logic.

Similar to this structure, you can create test classes for other pages and features, maintaining all test cases inside the testScripts package.


Related Tutorials

Related Questions


Read more