

This section outlines the prerequisites, installation steps, and configuration required to get started with Appium.
Prerequisites
Before installing Appium, a programming language, Android Studio, and Node.js needed to be installed on your Windows Machine.
1. Programming Language and IDE: Install your preferred programming language and an IDE for writing test scripts. Install the corresponding runtime and setup tools (e.g., JDK for Java, Python, or Node.js for JavaScript).
2. Android Studio: Required for Android testing. Installing Android Studio provides essential components such as:
ADB (Android Debug Bridge) – for device communication
Emulator – to simulate Android devices
SDK Manager – to manage Android platform tools and SDKs
Android Studio Installation Steps:
1. Go to the official website: https://developer.android.com/studio
2. Download the Windows installer (.exe file).
3. Run the installer and follow the setup wizard.
4. During installation, make sure to select:
- Android SDK
- Android SDK Platform
- Android Virtual Device
5. After installation, open Android Studio → go to More Actions → SDK Manager → install required SDK platforms and tools.
3. Node.js: Appium is built on Node.js, so having it installed is necessary to run Appium via the command line.
Node.js Installation Steps:
1. Visit: https://nodejs.org/en/download
2. Download the LTS (Long-Term Support) version for Windows.
3. Run the downloaded installer.
4. Keep default options and complete installation.
5. Verify installation by opening Command Prompt and running:
- node -v
- npm -v
Installing Appium
There are two primary ways to install Appium:
1. Appium Desktop (GUI)
Appium Desktop is a graphical interface that comes with a built-in Appium Server and Inspector tool. It’s beginner-friendly and useful for inspecting app elements visually.
1. Download Appium Desktop
2. Visit the following link GitHub Link
3. Click and download Appium-Server-GUI-windows-1.22.3-4.exe
4. Install the exe file
5. Launch the Appium desktop
6. Open Appium Desktop.
7. You will see a GUI with fields for Host and Port.
- Default values:
- Host: 0.0.0.0 (you can edit to the required IP, e.g., 127.0.0.1)
- Port: 4723
8. Click the "Start Server" button.
Note:
The URL http://127.0.0.1:4723/wd/hub in your test code connects to this server. If you change Host/Port, update your code!
These values are used to construct the server URL when initializing the Appium driver in your code:
AppiumDriver driver = new AndroidDriver(new URL("http://127.0.0.1:4723/wd/hub"), caps);
You can change the Host and Port if needed, but make sure to reflect the same values in your code.
You can configure additional options for Android or iOS under the Advanced tab in the GUI.
Appium via CLI (Command Line Interface)
For advanced usage and CI/CD integration, installing Appium via the command line is recommended.
Use the following command to install Appium globally via npm:
1. Install Appium Server Globally
- Open Command Prompt.
- Run the following command: npm install -g appium
2. Start Appium Server
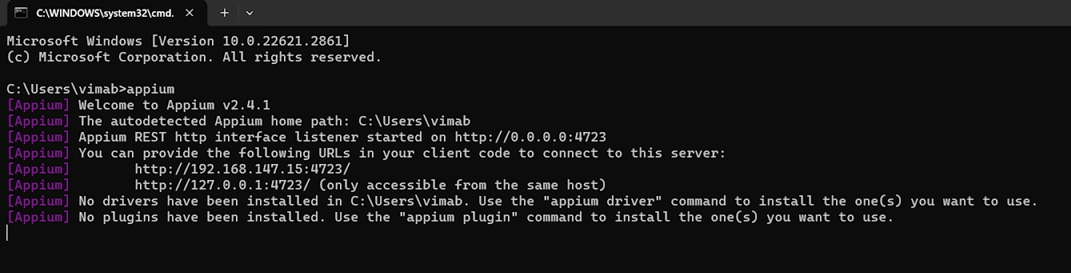
- After installation, start the Appium server by running: appium
- The terminal will show that Appium is running and listening on port 4723 (by default).
Install Drivers After Appium
Appium needs drivers to control specific platforms (Android, iOS). You must install these separately, even after installing Appium Desktop or via CLI.
1. Open Command Prompt/PowerShell.
2. Install Required Drivers:
- Android (UIAutomator2 Driver - Most Common): appium driver install uiautomator2
- iOS (XCUITest Driver - Requires macOS): appium driver install xcuitest
(Note: iOS testing generally requires macOS/Xcode)
3. List Installed Drivers: appium driver list --installed
Verifying Installation
Once everything is set up, open a terminal or command prompt. Run the following command to verify Appium installation: appium -v
This should return the installed Appium version.
You can also run: appium doctor
This command checks for common required dependencies.
Install Appium Inspector
Appium Inspector is a GUI tool that helps inspect the elements of mobile applications. It allows viewing an app’s UI hierarchy and retrieving locators needed for automation scripts.
1. Go to the official GitHub releases page: https://github.com/appium/appium-inspector/releases
2. Under the latest release, download the Windows installer file (.exe).
3. Double-click the downloaded .exe file to install.
4. Follow the on-screen instructions in the setup wizard.
5. Once installed, you can launch Appium Inspector from the start menu directly
These are the few basic tools that are required to work on an Appium UI automation project.
