

The first step in using Selenium WebDriver with Java is to set up the development environment. This setup involves configuring Java, choosing an IDE, managing dependencies, and ensuring all components, such as Selenium, Java, and browser drivers, work together seamlessly for smooth test automation execution.
Step 1: Install Java Development Kit (JDK)
Download and install the Java Development Kit (JDK) from the official Oracle Website or use an open-source version like OpenJDK. After installation, configure the JAVA_HOME environment variable and update the PATH variable to include the JDK binaries. For a clearer explanation of JDK installation, refer to this link: Java Installation.
Step 2: Set up an IDE
After installing Java, the next step is to choose a tool for writing code. While a basic text editor allows you to write code, an Integrated Development Environment (IDE) provides additional features like code completion, debugging, and build tools, which will be useful for writing and running Selenium test scripts. Popular options include IntelliJ IDEA and Eclipse. Download and install your preferred IDE from its official website.
IntelliJ IDEA download page: https://www.jetbrains.com/idea/download/
Eclipse download page: https://www.eclipse.org/downloads/
Once the IDE is installed and ready, the next step is to create a new Java project.
Step 3: Create a New Java Project in the IDE
A Java project is a structured workspace containing source code, libraries, build files, configuration files, and resource files. Before creating a new Java project, it is important to understand Build Systems
A build system is a software tool that automates the process of converting source code into executable software. In Selenium projects, build systems are mainly used to manage dependencies like Selenium WebDriver, TestNG, and third-party libraries for reporting or logging. Instead of manually downloading and linking each library, a build system handles it automatically.
Maven and Gradle are the two most commonly used build systems in Java projects.
Maven:
Maven is a build automation and dependency management tool. It uses an XML-based configuration file (pom.xml) to manage dependencies and plugins. Once dependencies are added, Maven automatically downloads and updates the required libraries.
Gradle:
Similar to Maven, Gradle is also an automation and build management tool. Gradle uses Groovy or Kotlin DSL (Domain-Specific Language) to manage dependencies.
To create a new project,
Open your IDE (IntelliJ IDEA or Eclipse),
Then go to: File > New > Project
Provide a Project Name
Select the Project Location
Choose a Build System: Maven or Gradle
Step 4: Add Selenium WebDriver as a Dependency
Once the Java project is created using a build system like Maven or Gradle, the next step is to add Selenium WebDriver to the project.
Selenium WebDriver is a core library that enables browser automation. Instead of downloading the JAR files manually, modern build tools like Maven and Gradle can automatically manage dependencies through configuration files (pom.xml or build.gradle). This simplifies project setup and ensures your project stays up-to-date with the correct versions of libraries.
Add Selenium WebDriver Dependency to a Maven Project
To include Selenium WebDriver in the project, open the browser and search “selenium webdriver maven dependency”. In the search results, click the link that leads to the MVN Repository site, or directly visit https://mvnrepository.com.
On the Maven Repository site, navigate to: Home > org.seleniumhq.selenium > selenium-java.
Select your desired Selenium version, preferably the latest stable release. Click on the version number to open the details page. On this page, you’ll find a Maven dependency snippet provided by the repository.
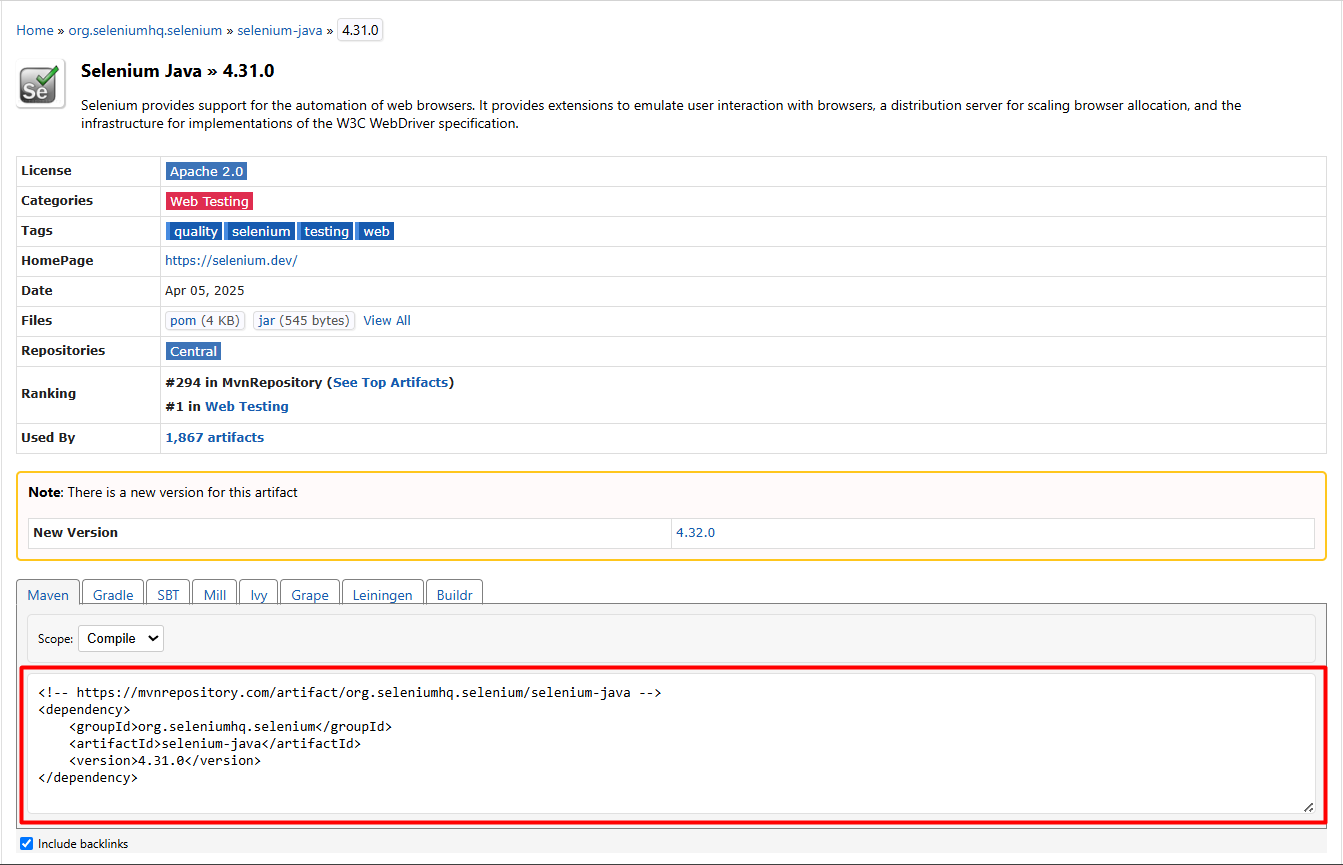
Now, open your IDE and locate the pom.xml file in your Maven project. Paste the copied snippet inside the
In some cases, restarting the IDE may be necessary to trigger the download and integration of the added libraries in the pom.xml file.
Add Selenium WebDriver Dependency to a Gradle Project
To include Selenium WebDriver in the Gradle project, open the browser and search “selenium webdriver maven dependency”. In the search results, click the link that leads to the MVN Repository site, or directly visit https://mvnrepository.com.
On the Maven Repository site, navigate to: Home > org.seleniumhq.selenium > selenium-java.
Select your desired Selenium version, preferably the latest stable release. Click on the version number to open the details page. On this page, by default, it shows Maven. Change it to Gradle. In Format, select the required format, Groovy/Kotlin. You’ll find a Gradle dependency snippet provided by the repository.
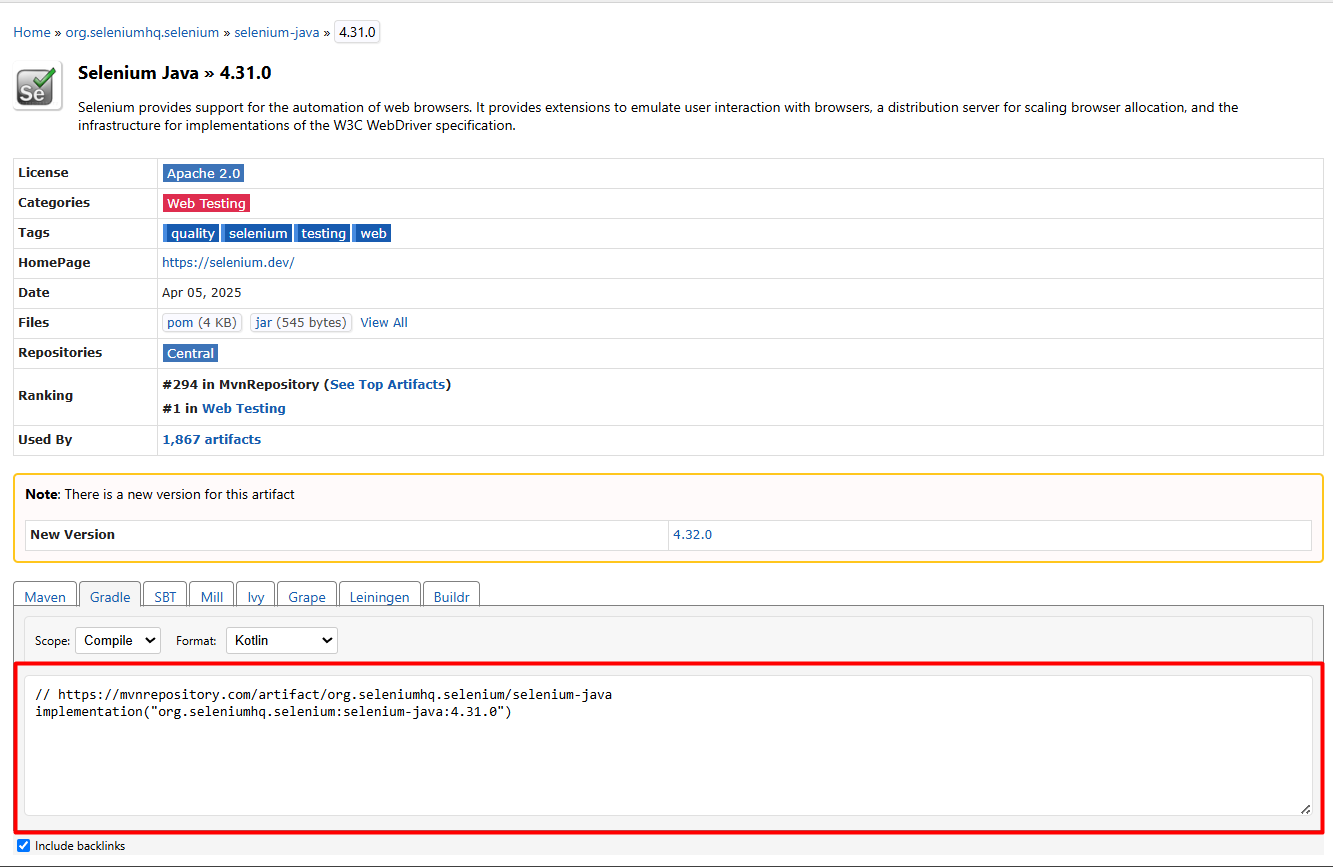
Next, open your project’s build.gradle file in the IDE. Locate the dependencies block and paste the copied line within it. This will add Selenium WebDriver to your project configuration.
After saving the file, sync the Gradle project so that it can automatically download and integrate the required libraries. If the sync doesn't start automatically, you can trigger it manually from the IDE’s build menu.