

In this section, we will go through all the requirements needed to use Playwright with JavaScript and learn how to install Playwright on your local machine.
Playwright supports all major operating systems:
- Windows 10 / 11
- Windows Server 2019+
- WSL Linux (Debian 12/13, Ubuntu 22.04 / 24.04 – x86-64 or arm64)
- macOS 14 or later
Playwright also supports multiple programming languages such as TypeScript, JavaScript, Python, .NET, and Java. In this tutorial, we will use JavaScript.
Requirements
To get started, we need:
- Node.js (latest LTS versions: 20.x, 22.x, or 24.x)
- npm (comes bundled with Node.js)
- A code editor (Visual Studio Code is recommended)
1. Installing Node.js
First, check whether Node.js is already installed on your machine.
Open the terminal or command prompt and run: node -v
This command will return the installed Node.js version.
If Node.js is not installed, or if the version is below 20, follow these steps:
- Go to: https://nodejs.org/en/download
- Download the installer (MSI for Windows).
- Run the installer and complete the setup.
- After installation, open the terminal and run: node -v
You should now see the installed version number.
2. Install npm
npm is installed automatically along with Node.js.
If you want to update npm to the latest version, run: npm install -g npm
To verify the npm version, run: npm -v
3. Install VS Code Editor
You can use any code editor, but for this tutorial, we will use Visual Studio Code (VS Code).
- Visit: https://code.visualstudio.com/download
- Select your operating system and download the installer.
- On Windows, run the .exe file to complete the installation.
4. Playwright Installation
Now let’s install Playwright in a new project folder.
Step 1: Create a New Folder
You can create the folder manually or use the terminal:
Step 2: Install Playwright
Inside the folder, run the Playwright installation command: npm init playwright@latest

You will be prompted to choose:
- Language → Select JavaScript
- Test folder name → Enter tests
- Install Playwright browsers → Type Y and press Enter
- Playwright will automatically download Chromium, Firefox, and WebKit
Once the browser installation is complete, the Playwright setup will finish.
Step 3: Verify Installation
Run the following command: npx playwright -v
You should see the Playwright version displayed, confirming that the installation was successful.
Playwright Project Workspace Structure
After completing the Playwright installation, a basic project structure is created.
The Playwright project includes package.json and package-lock.json files for dependency management, playwright.config.js file for configuring browsers, timeouts, reporters, and test behavior, and a node_modules folder that contains all installed dependencies. A tests folder is also created by default, along with a sample test file such as example.spec.js.
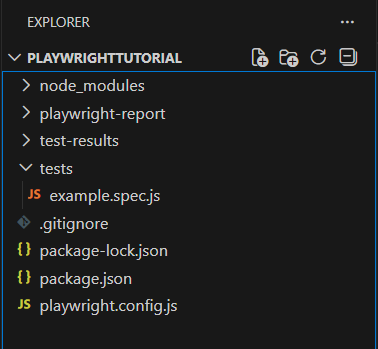
The tests folder is where all Playwright test files should be written. Playwright automatically scans this folder and executes files that follow the default test naming pattern. Files with the .spec.js extension are treated as test specification files and are picked up by the Playwright test runner. Normal .js files are usually used for helper functions, utilities, or reusable logic.
The playwright-report and test-results folders are generated only after running tests using npx playwright test. The playwright-report folder contains the HTML test report, and the test-results folder stores execution artifacts such as traces, screenshots, and videos, which are mainly used for debugging test failures.
This initial structure is sufficient for getting started. When using the Page Object Model (POM), the tests folder structure will be expanded and organized in a more scalable way, which will be covered in the POM section.